|
|
|
|
Supplying the trade since 1983
Traditional & modern wood finishing materials, furniture fittings & metal patination products
|

|
|
|
|
|
|
|
|
A Guide to Wood Stains
| Definition of Wood Stains |
|
There are many types of wood stains , or dyes available. A wood stain in the furniture restoration world is defined as a solution or suspension of dyestuffs and/or pigments in a selected solvent. They are designed solely as a colouring agent - to alter the natural colour of the timber and enhance the grain pattern. These products should not be confused with the term "stain" used to describe certain DIY products - which are actually tinted varnishes, and have completely different properties and application criteria. A proper wood stain has very little or no sealing properties - the appropriate sealer or finish should be applied afterwards. The advantages of this essentially two stage process are that the colour and grain pattern characteristics of the timber are enhanced rather than partially obscured. Also the colour is in the timber itself, rather than sitting in the finish - slight scrathes and blemishes that may occur can be more easily repaired. Additionally the restorer has much more control over the desired finish.
|
| Types of Wood Stains |
|
Briefly speaking, there are three common types of wood stain available. Your choice of wood stain should be governed primarilly by the type of finish you are applying. A general rule is to select a stain that has a different solvent base than the finish you will be applying over it - as stated above, wood stains generally do not self seal when dry, so the dyestuff is still "active" and can react. A water based dye for example will probably react when applying a water based finish over it. The reaction might only be slight and acceptable, or whole streaks of colour may be dragged out of the surface on applying the finish - a mini disaster !
Water Based Stains
Examples from our range are Liberon Palette Wood dye and Jenkins NGR stain . These types of stains are generally compatable with French polish, shellac sealer, cellulose lacquer, wax polishes, oil finishes and oil based varnishes such as polyurethane. The advantages are low odour, versatility and reasonably fast drying time. The only disadvantage sometimes is that, particularly with soft woods such as pine, water stains can raise the grain of the timber - the softer less dense fibres can expand and push the hard denser grain fibres up resulting in an uneven surface. The Jenkins NGR (Non Grain Raising) stains are modified to prevent this though. This problem can also be overcome by wetting the timber with water first, then sanding back when dry if and when the grain raises, then applying the stain.
Spirit Dyes
This term applies to wood stains that are alcohol based. An example from our range is Liberon Spirit Dye . These are compatable with water based sealers including Bonakemi Mega floor sealer, and oil based products such as Fiddes Hard Wax Oil. Wax polishes can be used with these stains but it is advisable to seal the surface first with shellac sealer. Advantages are non grain raising properties and good penetration when using on hard woods such as oak and mahogany. Disadvantages are relatively slow drying time (2-6 hours approximately) and the solvent odour.
Light Fast Stains
Not usually available from the usual DIY outlets, these stains are alcohol based. The Morrells Light Fast range is an example, although Mylands, Fiddes and Morrells among others produce their own versions. These types of stain are generally used in the spray lacquering industry either as a direct stain, or as a tinter - they can be added to lacquer to create a tinted finish - particularly useful when colour matching. As a wood stain, these are compatable with oil finishes, oil based varnishes such as polyurethane and water based sealers. The two big advantages with this type of stain are very fast drying times (30 minutes) and good penetration both for soft and hard woods. However they are not suitable for more traditional wood finishing involving shellac sealer/wax or French polish.
Other Stains
Oil Stains are a traditional blend of dyes, pitches and tars in an organic solvent blend, broadly similar to spirit dyes. They are only used by some professional restorers using French polishing techniques. Not compatable with any other type of finish, they are best avoided. Unless sealed in properly with several coats of French polish, oil stains in certain circumstances can bleed through the surface of the polish....
Nitrostains, Napthstains are essentially modified oil stains, that are compatable with cellulose lacquers as well as French polishes.
|
| Which Colour ? |
|
From our experience no two colours are the same. Manufacturers will select a nominal term for a particular shade of stain, but these "names" are, well, nominal. One makers Walnut for example will most likely be different to anothers. A good example is the "Teak" colour ; Bolloms water based teak stain is a mid greenish brown - Liberons is an orangey brown mahogany shade. Colour charts where available should be consulted, but these are only a guide. The only way of accurately predicting the colour of a stain is to apply it to the timber. So, if the colour is of vital importance, test it on a spare piece of timber first if possible. Failing that, start with a shade that may be too light - darkening the colour is infinitely easier than trying to lighten an applied stain that is too dark, which is virtually impossible without resorting to sanding the colour out and starting again. Even the strongest wood bleachers can have inconstistant results with wood stains.
Remember also that the true effect of a wood stain will not become apparent until the finish is applied. If you are going to the trouble of doing test pieces, follow it through by applying your finish over the stain. We have many customers visiting us with pieces of timber requiring colour samples - which we are more than happy to do. But as well as wiping several stains onto the timber, we also apply a sealer to give as accurate a sample as we can.
|
| Applying Wood Stains |
|
Firstly prepare the surface correctly . It should be properly stripped and sanded where necessary, and any wood dust removed with a tak rag or damp cloth. Any residual polish or varnish will interfere with the staining process. The surface should be sanded down with a P240 grit paper or finer. Rougher surfaces may need progressive sanding starting with coarser sandpaper, usually P80. Even new timber will benefit from a light sanding prior to finishing. The art of wood finishing lies in the preparation - short cuts here will be paid for later...
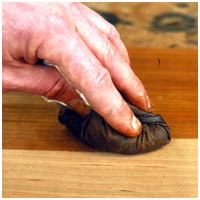
There are three ways to apply a wood stain : brush, rag or spray. Spraying wood stains is limited to professional users only who have the proper equipment. Even then this method is limited to certain types of stain, and any excess stain applied will have to be wiped off with a rag. Wiping or ragging a stain is by far the best method. The stain is naturally worked into the surface of the timber, and the wiper or rag absorbs any excess stain to give an even coverage. Always work with the direction of the grain in long strokes. This avoids any overlapping marks that may occur otherwise. Always use a white lint free cotton cloth, particularly with spirit dyes. Two coats of stain are preferable to ensure eveness of colour. Allow the stain to dry thoroughly before proceeding with the finish. Small difficult to reach areas such as mouldings or carvings may be touched in with a soft bristle pencil brush.
Larger areas such as floors may be stained with a paint brush for quickness, but remember to follow the direction of the grain, and stain one board at a time working quickly to avoid overlapping marks.
Allow the stain to dry before proceeding with the finish. If unsure leave overnight to dry.
|
[ Back to Top ]
A Brief Guide to French Polishing
|
Introduction |
|
Shellac is an encrustation surrounding an insect known as Laciffer Lacca, which is a parasite living on certain trees in India and other Eastern countries. The insect is about a 50th of an inch long and has a life cycle of about six months.
The shellac is gathered by cutting the infected twigs from the trees. In this form it is known as Stick Lac. The shellac is scraped off the twigs and washed with water to remove the particles of twigs and other impurities and when dry, is known as Seed Lac. This is put into canvas tubes and heated over a fire. One end of the tube is fixed and the other is rotated to squeeze the molten shellac through the hessian as it melts. The initial shellac that comes through is clean and small amounts are dropped on to a cold stone, where it sets in the form of a thin disc up to about 3" in diameter. This is known as Button Lac from
which Button Polish is made. The next amount of shellac that oozes through may contain impurities which would easily be detected visually if the shellac was in the form of a button and it is, therefore, stretched into a thin sheet and crushed, when cold, into flakes, from which French Polish is made. Modern processing plants now exist for producing machine made shellacs, similar to the hand made varieties.
White and Transparent Shellac is made by dissolving the Seed Lac in a hot caustic solution of water and then bleaching the solution with chlorine. After bleaching the caustic is neutralised with an acid, which causes the shellac to precipitate out of solution. In this form it is known as Bleached Shellac. Bleaching shellac alters its chemical properties, so that unless it is dissolved in alcohol within 3-4 days after bleaching, it will become insoluble.
Shellac contains a very small amount of wax from the insect. The wax is insoluble in alcohol and causes the cloudiness which can often be seen settling towards the bottom of the container. Transparent Shellac is made by removing the wax from the bleached shellac by washing it with a petroleum solvent, which dissolves the wax but not the shellac.
French polish is a wonderful, versatile finish and it's easy to make your own by simply adding crushed/flake shellac to methylated spirits. (In finishing, alcohol-based methylated spirits is referred to as 'spirits' and it's important not to confuse this with white spirits which is oil based.) It may take a few days to dissolve the shellac so keep giving the bottle a shake.
The simplicity of the materials, however, is in stark contrast to some of the difficulties experienced by beginners!
|
| Application |
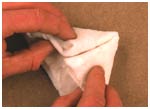
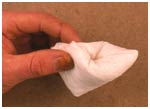
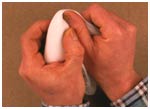
At its most basic level, French polish is a decorative surface coating with sufficient workability to become an integral part of the wood. It's this that allows French polish to stand out from other surface coatings, but only if it's correctly applied. It can, of course, be brushed on, as you would a varnish, and very good results are achieved by applying four or five coats with a polishing mop, cutting back between coats and waxing with a fine paste wax. However, French polishing as a process creates a much higher shine which is achieved by 'rubbing' the polish using a pad of wadding wrapped in a cotton cloth and known as a 'rubber'. The wadding used must be unbleached to retain its springiness during polishing - cotton wool is not suitable. When used without a cotton outer, this wadding pad is known as a fad, and in the early stages of polishing it can be used on its own. However, I still prefer to use a rubber for all stages as there's less risk of fibres becoming trapped in the polish. There's nothing difficult about either making or charging a rubber with polish. The polish should be poured carefully into the centre of the opened up fad. Don't apply too much polish as the aim is not to flood the surface; traditionally, a corked bottle with a groove cut in the corks side is perfect for both pouring and initially mixing up the polish although a clean washing up bottle would probably do just as well. Never pour polish directly onto the face of the rubber or try dipping the rubber in polish - the whole point of using the wadding is for it to absorb and then release polish in a controlled way.
|
| Making a Rubber |
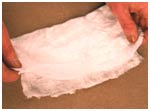
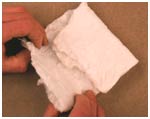
To make the fad, soak a 9-10in (220-250mm) square of wadding in polish, flatten and leave to dry. This reduces the thickness of the wadding helping it to fold as well as removing most of the risk of tiny bits of fibre dropping from the fad during polishing. Soften in spirits before use.
Fold the wadding in half, and then into three. The rough edge left becomes the heel of the fad. Fold in to make a triangle with the rough edge opposite the point. Turn up the back two corners to make a palm-sized pad.
The cotton outer gives a smoother face for fine finishing and must be clean and without defect; again, use a piece around 220-250mm square. Holding the fad in the left hand, drape the cotton over the fad leaving around 50-60mm (2-21/2in) overhang at the back. Move the left hand to the front, pinch the point and hold it tight.
Use the thumb of the right hand to pull and then tuck the cloth over in folds making sure you keep the point, then gather the spare material by wrapping the cotton cloth in on itself by twisting. This spare material is tucked into the palm of the hand during use.
|
   |
| Surface Preparation |
|
After fine sanding, check the surface for cutter marks and for torn grain. Timbers with open pores may need grainfilling prior to polishing. Traditionally this involves pushing powdered fillers into the pores using an open-textured cloth. Plaster or plaster based fillers may be used for this. Nowadays specially formulated grain fillers are available, usually in a variety of colours. These are typically oil based thixotropic pastes, with the consistency of a thick mud. They are a lot more efficient at filling the grain - usually one or two applications is sufficient. These are worked into the surface, left to dry, and lightly sanded back ready for polishing. If a wood stain is to be used, it is applied at this stage - gently wiped on with a rag along the direction of the grain, and left to dry thoroughly.
|
| Types of Polish |
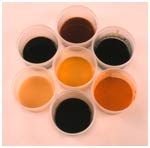 French polish is available in many different shades and you can even colour your own using powder spirit stains. Button polish, for example, is yellowish in colour, deriving its name from the large discs or 'buttons' that it is made from. Garnet is a brown polish, orange is golden brown, whilst white and transparent are clear. On high-gloss work, white polish can slightly obscure some of the figure giving a milky appearance. Some French polishes have limited shelf lives, white polish in particular lasting only a few months, whilst others can still be used after a few years if stored properly. French polish is available in many different shades and you can even colour your own using powder spirit stains. Button polish, for example, is yellowish in colour, deriving its name from the large discs or 'buttons' that it is made from. Garnet is a brown polish, orange is golden brown, whilst white and transparent are clear. On high-gloss work, white polish can slightly obscure some of the figure giving a milky appearance. Some French polishes have limited shelf lives, white polish in particular lasting only a few months, whilst others can still be used after a few years if stored properly. |
| Strength of Polish |
 Next there is the strength of the polish. If you buy ready-made polish you'll need to know the ratio of shellac to spirits. A good initial strength is a 21/2 lb cut i.e., 21/2 lb (or just over 1kg) to one gallon (5 litres) of spirits. Some polishes have more spirits than this and being weaker take time to body up. Trade polishes are often stronger being 4lb cuts or even 5lb or more and will need thinning. Most off the shelf polishes are about the 2 1/2lb strength, although others are available to order. Most restorers do not bother making their own polish from the dry shellac, the ready made polishes are of excellent quality and in most cases work out cheaper. Next there is the strength of the polish. If you buy ready-made polish you'll need to know the ratio of shellac to spirits. A good initial strength is a 21/2 lb cut i.e., 21/2 lb (or just over 1kg) to one gallon (5 litres) of spirits. Some polishes have more spirits than this and being weaker take time to body up. Trade polishes are often stronger being 4lb cuts or even 5lb or more and will need thinning. Most off the shelf polishes are about the 2 1/2lb strength, although others are available to order. Most restorers do not bother making their own polish from the dry shellac, the ready made polishes are of excellent quality and in most cases work out cheaper.
Once you've made the rubber, made or selected the polish, and charged the rubber with polish, you're then ready to start polishing.
|
| Basic Polishing |
It would be foolish to imagine that all of the intricacies of French polishing can be learnt from a series of short articles but there are many tips and guidelines that will help you to practice. It's important to understand what each stage is trying to achieve even if you don't achieve it first time! French polishing can be very time consuming but remember that the intention is normally to try and achieve a very high gloss. If you're not looking for this sort of finish, simply stop part way through the process, perhaps even finishing with a fine paste wax polish or even a burnishing cream. I'm a firm believer in learning by mistakes so try not to become frustrated if things go wrong at the practice stage. If you do get it wrong, just use a cloth soaked in spirits to wipe the polish back off again. It's important to train the eye to defects and potential problems, often before they actually occur, and this will only come with practice and experience.
One problem encountered during polishing is difficult to explain, but as an analogy, if you imagine brushing French polish or a varnish along the grain of a piece of wood, when looked at closely, brush marks will be apparent after drying. In fact, during some types of varnishing, brushing across the grain and then cutting back helps to eliminate these brush marks or ridges from building up. When applying polish along the grain using a rubber, even though its much finer than a brush, ridges still occur and will eventually become noticeable. Known as ropiness, the problem becomes very much more apparent the higher the gloss achieved. To avoid this happening, the polish is worked onto the surface initially using straight strokes, but then in a round and round movement, followed by figure of eight movements and again finishing in straight strokes. By following a careful pattern over the whole surface, ridges are both flattened out and the surface covered uniformly. This takes a fair amount of practice, but is worth the effort !
|
| Starting Polishing |
Initially, the polish is pushed into the wood to help fill any pores or open texture. This stage, known as fadding, uses no lubricating oil at all as this may be trapped under the shellac. It's surprising how far you can actually work without using any oil and the further the better.
Begin with quite a wet rubber, working until the rubber becomes quite dry. Don't be tempted to charge up the rubber again too early. The path of the rubber should be apparent but without leaving any ridges of polish. At this stage, keep rubbing until you feel the rubber needs recharging and work along the grain with a good degree of pressure. As you work, check the surface for unevenness, open texture and unfilled pores. Continue fadding with maybe three or four fads or rubbers but don't work on too fragile a surface.
Eventually of course, oil will be required to stop the rubber dragging or marking the surface. After sufficient coats have been built up, a process called "spiriting off" now begins. Successive coats of polish are applied, but gradually diluted with methylated spirit, with more meths being added as the number of coats progresses. Typically the meths ratio will start at about 25%, and gradually increase until at the end you are working with virtually 100% methylated spirit, using smooth passing strokes only.
When fully dry (one week or more), a good quality wax polish may be applied using a fine (0000) grade steel wool pad.
|
| A brief gude to the polishes we stock |
|
|
[ Back to Top ]
A Guide to Wax Polishing
|
Types of Wax Used in Furniture Polish
|
|
Several natural base waxes are used in the manufacture of commercial furniture wax polishes. The more common ones are as follows :
Carnauba -- a hard, quick-drying wax derived from the leaves of Brazilian palm trees. Carnauba can be buffed to a glossy sheen; it usually dries as a whitish film.
Beeswax -- a soft, sweet-smelling wax made of the secretions produced by honeybees; contaminants in beeswax give it a distinctive yellow to orange color.
Paraffin -- a soft wax gathered as a byproduct of distilling petroleum; also used to make candles.
Shellac wax -- the residue left over from dewaxing shellac.
Candelilla -- a vegetable wax derived from shrubs that grow in the deserts of Mexico and the southeastern United States.
Ouricury -- another hard, glossy wax derived from the leaves of Brazilian palm trees; very similar to carnauba wax, but darker in color.
Polyethylene -- a synthetic wax made from petroleum-based hydrocarbon polymers.
In the preparation of commercial blends, manufacturers sometimes add pigments and dyes to give waxes a darker color when they dry, which makes them more suitable to use over the finishes on dark-colored woods such as walnut, or mahogany that has been stained. The wax blends are dissolved in a selected solvent, usually turpentine or a hydrocarbon based medium. Some water based waxes are also available.
There are two basic type of wax blend available :
Paste Waxes -- Solid wax blends of varying consistencies, designed for furniture and smaller areas. Applied with a soft cloth or fine steel wool.
Liquid Waxes -- Wax blends in thinner liquid form, designed for larger areas such as panelling beams, floors etc. Applied with a brush.
|
|
Application of Wax Polish
|
|
In most cases, wax polish is generally applied to a sealed surface as a final dressing, to provide a little extra protection and gloss. Wax may be applied over any type of finish, making it a very versatile product. Application is quite simple ; the wax is gently wiped onto the surface using a fine steel wool (0000) pad, following the direction of the grain, left to dry then buffed with a furniture brush or soft cloth. The fine steel wool pad has two advantages : 1) It ensures an even coverage of wax, 2) Excess wax is absorbed back into the pad as it is used so the wax does not smear unevenly over the surface. Drying times do vary - Briwax should not be left more than 30 minutes, whereas a pure beeswax blend needs several hours to dry. Always consult the product information on the tin if unsure. When dry, a soft bristle buffing brush, even a shoe brush should be used initially to buff the polish. A second, third or fourth coat of wax polish can be applied between buffings. After the final coat has been buffed this way, gently burnish the surface with a soft cloth - stockinette roll is a good product for this. On a sealed surface two coats of wax is usually sufficient to give the desired effect. Too many coats of wax applied over too short a space of time can result in a haze forming which is very difficult to remove.
Occasionally, and particularly in the pine trade, wax polish is used on bare or pre-stained timber as a stand alone finish. Often coloured waxes are used for this purpose - they will stain and seal the timber in one application making them a time saving and cost effective finishing product. The method of application is the same - although a soft lint free cloth is often used to apply the wax. Bare pine for example is very absorbant, so liberal application of wax isn't so much of a potential problem. More coats of wax will be needed to achieve a glossy finish if desired - on pine 3-4 coats is usually enough. The only drawback with this method is that it has limited application. Wax polish itself will not offer an awful lot of protection to the timber. At best wax offers only moderate water resistance, and little heat resistance, so this type of finish is limited to items such as chest of drawers, doors etc. Table tops, worktops, floors and kitchen surfaces are not suited to wax polish finishes as more durable finishes are needed.
|
|
Which Wax ?
|
|
The choice of wax is really a matter of personal preference. Consistency, colour, price, odour are all factors that can dictate the selection of a wax polish. If applied correctly virtually all waxes will give the same type of finish and protection. We are more than happy to advise customers who may be unsure which wax to choose. A brief description of the waxes we stock is as follows :
Liberon Beeswax Paste -- A soft blend of beeswax and turpentine. Use sparingly as a top dressing.
Liberon Beeswax Liquid -- As above but in liquid form. Use on larger areas where the timber needs "feeding", such as beams.
Liberon Bison Paste -- A soft wax blend in available various colours, useful for enriching antique furniture etc.
Liberon Bison Liquid -- As above in liquid form.
Briwax Original -- A soft paste wax blended with toluene. Fast drying, used extensively in the pine trade.
Fiddes Supreme -- Used similarly to Briwax, without the toluene odour.
Harrells Original -- A traditional harder paste wax, petroleum based. Used exclusively for finishing Frenched polished furniture.
Flag Classic Wax -- A good value soft paste wax, used mainly for finishing pine furniture.
More details are available under the individual product descriptions.
|
[ Back to Top ]
|
|
|
|